Getting Started
This notebook demonstrates how to use xRHEED to load, inspect, and plot an example RHEED image.
The image used in this tutorial was recorded from a Si(111)-(7×7) surface. The electron beam was aligned along the \([11\bar{2}]\) crystallographic direction, and the image was captured at room temperature.
Load xRHEED module
First, import the xrheed library along with other useful Python modules.
import matplotlib.pyplot as plt
from pathlib import Path

import xrheed
🎉 xrheed v2.2.0 loaded!
Load a RHEED Image
Using dedicated plugin
RHEED images are loaded using dedicated plugins.
For more information on writing custom plugins, see the documentation: Plugins for Data Loading.
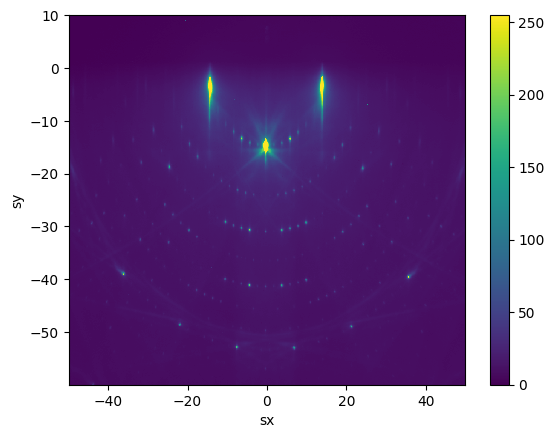
The image coordinates - sx (horizontal) and sy (vertical) - are expressed in millimeters.
This means that the plugin is responsible for converting pixel values to real-world dimensions using the appropriate scaling.
image_dir = Path("example_data")
image_path = image_dir / "Si_111_7x7_112_phi_00.raw"

rheed_image = xrheed.load_data(image_path, plugin="dsnp_arpes_raw")
Manual RHEED Data Loading
While writing and using a dedicated plugin is the recommended approach, it is also possible to load RHEED images manually (from BMP, PNG, TIFF).
In this mode, you must provide the necessary calibration parameters directly.
Use the load_data() function as shown below.
At minimum, the following three parameters are required:
screen_sample_distance(float) — Distance from sample to screen [mm].screen_scale(float) — Scaling factor [pixels per mm].beam_energy(float) — Beam energy [eV].
image_dir = Path("example_data")
image_path = image_dir / "test_rheed.BMP"

rheed_manual = xrheed.load_data(
    image_path,
    screen_sample_distance=350.5,
    screen_scale=9.5,
    beam_energy=18_600,
    screen_center_sx_px=749,
    screen_center_sy_px=82,
)
Data format
The RHEED data are loaded into an DataArray object using xarray module.
DataArray provides powerful built-in methods for data manipulation and analysis. These methods can be used to inspect, slice, and visualize the RHEED image, as demonstrated below.
rheed_image.sel(sx=slice(-50, 50), sy=slice(-60, 10)).plot()
plt.show()
The .ri Accessor
Tools dedicated to RHEED images analysis are available through the .ri accessor. Please refer to the API documentation to explore all available methods and properties.
For example, you can access basic properties of the RHEED image as shown below.
print(rheed_image.ri.beam_energy)
print(rheed_image.ri.screen_scale)
19400.0
9.3112
Return a human-readable summary of the DataArray and key RHEED metadata.
rheed_image.ri
<RHEEDAccessor>
  File name: Si_111_7x7_112_phi_00.raw
  File creation time: 2026-06-11, 13:45:11
  Image shape: (1038, 1388)
  Screen scale: 9.3112 px/mm
  Screen sample distance: 309.2 mm
  Incident (beta) angle: None
  Azimuthal (alpha) angle: None
  Beam Energy: 19400.0 eV
To view all metadata associated with the image, simply access the .attrs property of the DataArray object. This will display a dictionary of all attributes stored with the image.
rheed_image.attrs
{'plugin': 'UMCS DSNP ARPES raw',
 'screen_sample_distance': 309.2,
 'screen_scale': 9.3112,
 'screen_center_sx_px': 740,
 'screen_center_sy_px': 155,
 'beam_energy': 19400,
 'file_name': 'Si_111_7x7_112_phi_00.raw',
 'file_ctime': '2026-06-11, 13:45:11'}
RHEED Image Preparation
Screen ROI
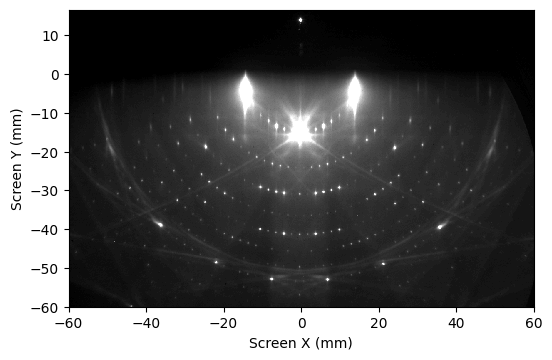
Define the region of interest (ROI) for the RHEED image. This ROI is used to set the limits for the sx and sy axes in the ri.plot_image() method.
The example below also demonstrates the use of the auto_levels argument, which automatically sets the vmin and vmax values for image contrast adjustment.
rheed_image.ri.screen_roi_width = 60
rheed_image.ri.screen_roi_height = 60

# Use automatic levels adjustment
# auto_levels: percentage of pixels to clip at both low and high ends.
rheed_image.ri.plot_image(auto_levels=1.0)
plt.show()
Setting the RHEED Image Center
Although the data-loading plugin typically provides screen center information, manual fine-tuning is often required. The image center is defined as follows:
Horizontal center (
sx = 0): The line connecting the specular spot and the transmitted beam (note: the transmitted beam may not always be visible).Vertical center (
sy = 0): Positioned at the shadow boundary.
These values depend on the specific RHEED setup and usually require manual adjustment for each image or image series.
Manual Center Adjustment
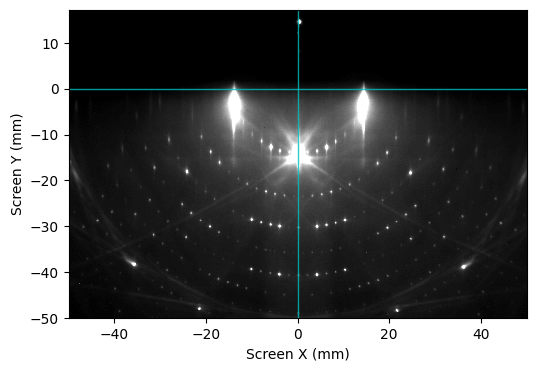
You can manually adjust the image center using the method shown below.
Note: Repeated application of the accessor method
ri.set_center_manualwill continuously shift the image by the specified values. To avoid cumulative displacement, we reload the image in the same cell.
image_path = image_dir / "Si_111_7x7_112_phi_00.raw"
rheed_image = xrheed.load_data(image_path, plugin="dsnp_arpes_raw")

rheed_image.ri.set_center_manual(center_x=-0.5, center_y=-0.6)
rheed_image.ri.plot_image(show_center_lines=True, auto_levels=1.0)

plt.show()
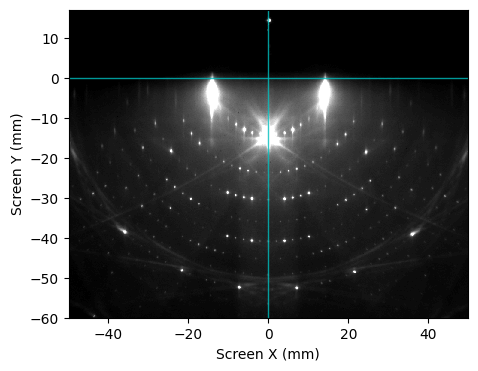
Automatic Center Search
The center could be set automatically via accessor method ri.set_center_auto().
This method supports the update_incident_angle argument. When set to True, the incident (β) angle is updated based on the positions of transition and specular spots, which are detected during the center search process.
Note: Automatic center detection operates on the ROI image. If it fails, consider adjusting the ROI to improve results.
rheed_image.ri.screen_roi_width = 50
rheed_image.ri.screen_roi_height = 60

rheed_image.ri.set_center_auto(update_incident_angle=False)

rheed_image.ri.plot_image(show_center_lines=True, auto_levels=1.0)

plt.show()
Semi-Manual Search for Image Center
The module xrheed.preparation.alignment provides two functions to help locate the horizontal and vertical center of a RHEED image.
It is recommended to follow this sequence:
First, determine the horizontal center using
find_horizontal_center(image).Then, pass the calculated value to
find_vertical_center(image, center_x).
This order is preferred because the vertical center search attempts to locate the mirror and transmission spots near sx = 0, which depends on an accurate horizontal center.
from xrheed.preparation.alignment import find_vertical_center, find_horizontal_center

center_x = find_horizontal_center(rheed_image)

center_y = find_vertical_center(rheed_image, center_x=center_x)

print(f"Determined values: {center_x:.4f}, {center_y:.4f}")
Determined values: 0.0671, -0.0000
Setting the Incident Angle
The plugin assigns a default value for the incident (grazing) angle, denoted as β. However, for accurate Ewald sphere construction, this value should be manually set or calculated.
If both the mirror-reflected and transmitted spots are visible in the RHEED image, their positions can be used to fine-tune the shadow edge location (sy = 0.0).
To estimate the incident angle, use the find_incident_angle() function from the xrheed.preparation.alignment module. This function returns the calculated angle.
Note: The incident angle may already be updated automatically if
ri.set_center_auto(update_incident_angle=True)was used.
from xrheed.preparation.alignment import find_incident_angle

real_incident_angle = find_incident_angle(rheed_image)
To update the image attribute with the real incident angle β, you can use the .ri accessor:
rheed_image.ri.incident_angle = real_incident_angle
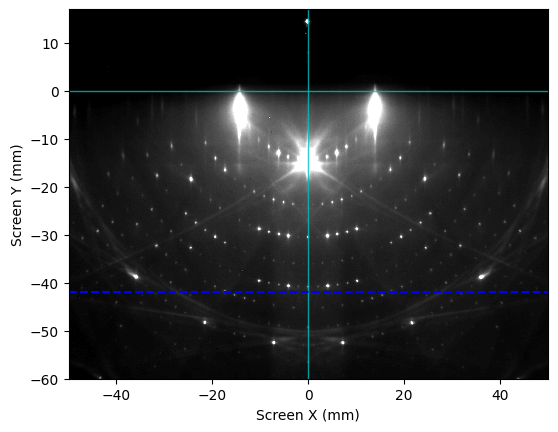
Image Rotation
If the RHEED camera is not perfectly aligned, it may be necessary to rotate the RHEED image to ensure that the shadow edge is perfectly horizontal.
# Create a copy of an image
rotated_image = rheed_image.copy()

# Rotate the image
rotated_image.ri.rotate(-0.4)

fig, ax = plt.subplots()
rotated_image.ri.plot_image(ax=ax, show_center_lines=True, auto_levels=1.0)

# add horizontal line to check the rotation alignment
ax.axhline(-42.0, color="b", linestyle="--")

plt.show()
# Use now the rotated image for further analysis
rheed_image = rotated_image

# Apply automatic center search again after rotation
rheed_image.ri.set_center_auto()
High-Pass Filter
Apply a high-pass filter to remove the homogeneous background signal from the RHEED image.
You can adjust the following parameters:
sigma(in mm): controls the width of the Gaussian kernel used for blurring,threshold: scales the blurred image before subtraction.
The filtered image is computed as:
filtered_image = real_image - threshold * blurred_image
from xrheed.preparation.filters import high_pass_filter

sigma = 3.0
threshold = 0.8

hp_rheed_image = high_pass_filter(rheed_image, sigma=sigma, threshold=threshold)

hp_rheed_image.ri.plot_image(
    auto_levels=0.5, show_center_lines=True, show_specular_spot=True
)
plt.show()
